
Checkboxes are multifunctional and help you style your document in multiple ways. They are ideal for conducting surveys, especially when you are conducting professional surveys and you want easier updates about the progress of the situation around. Checkboxes make it a lot easier for you to navigate the answers without any further complications.
However, as easy and simple as it looks to add a checkbox in the Word document, it is not as straightforward as it seems. Typically, you need to follow along with a few important steps like we have sorted out for you in here.
There are two easy ways in which you can insert a checkbox into your Word document. We have explained both the processes in this article for you.
Using Word’s Developer Tools
The easiest and fastest way to make a fillable form with a drop-down and checkbox is using the Developer’s Tools that are available on MS Word. The developer tab contains a host of amazing features and functions that are here to streamline your user experience beyond comprehension.
Here’s how you can enable the Developer tool under Word.
- Open a Blank Word document
- Under that, navigate to the taskbar and click on the File drop-down menu
- From there, choose the “Options” command
- From the Word Options window, click on Customize Ribbon tab and click on Main Tabs under that
- In the drop-down menu, you will find the “Developer” check box. Find that and click OK
- Doing these will add the Developer tab onto your Ribbon. Once you have that sorted, it becomes smooth sailing from there.
- From under the Developer tab, you need to click on the “Check Box Content Control” button. It should be a little square box with a tick mark inside.
This option is mainly effective when you want to use a digital copy of the Word Document and use it for other purposes. However, in case you want to use the check box scenario for a printed document, there is an easier way to achieve that without breaking your bones.
Change the Bullets to Check Boxes
In case you want to integrate the check box into a printed project on your Word Document, the process is pretty simple. The Developer Ribbon tabs and issues are pretty complicated and not something everyone wants to indulge in. If you are struggling with the same issue, this is an easier way.
- Open a New Word Document and get sorted with the content
- Once that is done, navigate to the “Home” tab and find the bullets under it
- Under the bullet list, navigate to the bottom to find the “Define New Bullet” command
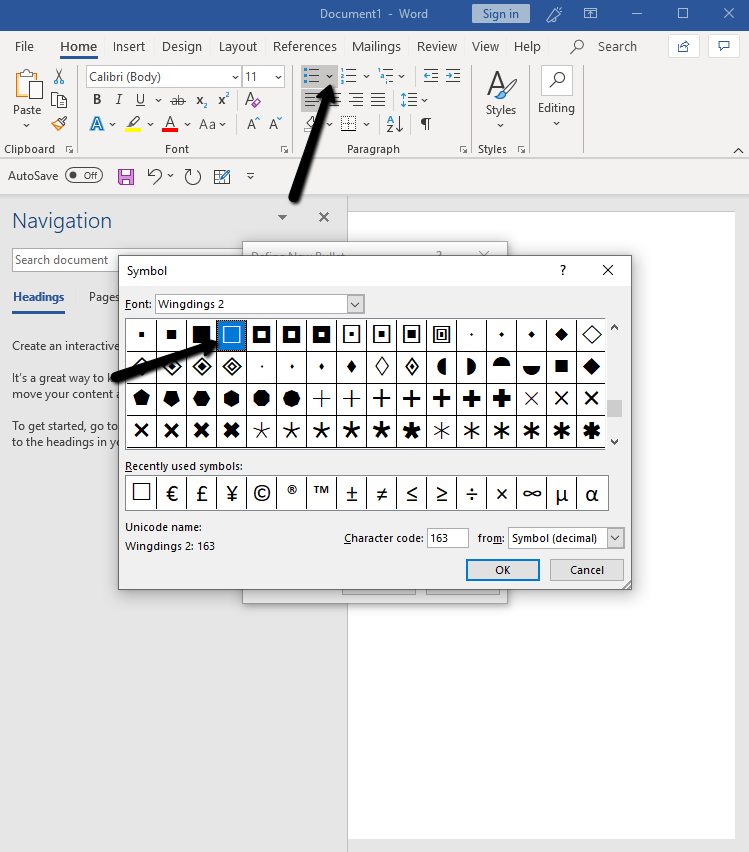
- Click on Symbol from there
- Under the Symbol, select the Font option from the dropdown list and click on WingDings 2 option
- From the list of symbols available, navigate through and find the Empty square box symbol. That is what signifies the checkbox.
- Once you have selected the symbol, click on the OK button and the symbols should be in place.
This is amazing when you are printing out documents from the written file and have to get the checkboxes manually filled in.
Conclusion
If you were confused about adding checkboxes to your digital or printable Microsoft Word document, we hope this article gives you an insight into the process. Keep in mind that the processes are simple. You just need to follow along with the steps and use the process that works more efficiently for you. We’d highly recommend that you try this on Google Docs too because the processes work pretty much the same there as well.