

If you have already installed third-party snipping tool in your windows computer and want to learn how to create a keyboard shortcut then let’s start with this post.
Basically, the previous version of Windows OS are taking a snapshot of a window or full screen was a boring work like we want to first press the Print Screen key on the keyboard, and then open Paint program and then press Ctrl + V hotkey to take the snapshot. Users who wanted advanced tools had no options but to go for third-party tools.
While taking snapshots without installing third-party tools Microsoft first introduced Snipping tool with Windows Vista and the same feature exists in Windows 7, Windows 8/8.1 and the latest Windows 10 as well.
Using this Snipping Tool we can easy to capture text, graphics, and any related annotations and then save them on your well safe folders. And also Microsoft has not defined a default keyboard shortcut for Snipping Tool.
Now you should need to either go through the Start menu or enter the search keyword in the Start menu search to open it. Wouldn’t it be cool if it was likely to launch Snipping with the assist of a keyboard shortcut?
Keyboard shortcut for Snipping tool in Windows
All right, here’s you can easy to create a keyboard shortcut to begin snipping tool in Windows 10/7. To create a keyboard shortcut for the Snipping Tool, By following the simple steps given below:
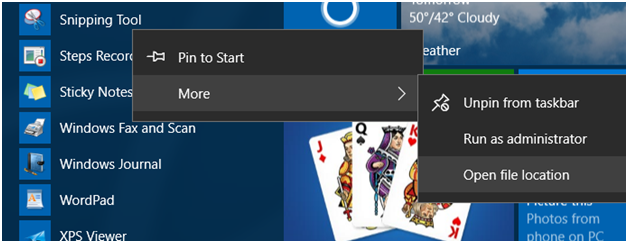
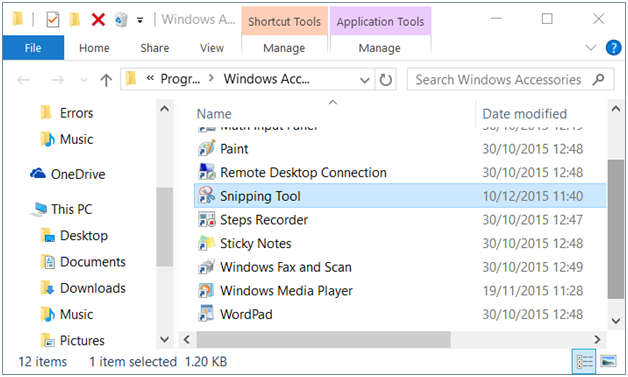
Step 1: On Windows 10, First navigate to Start > All apps > Windows Accessories, and right-click on Snipping Tool entry, click More, and then click Open file location to open Windows Accessories folder.
Step 2: Now right click on the Snipping Tool shortcut, click Properties.
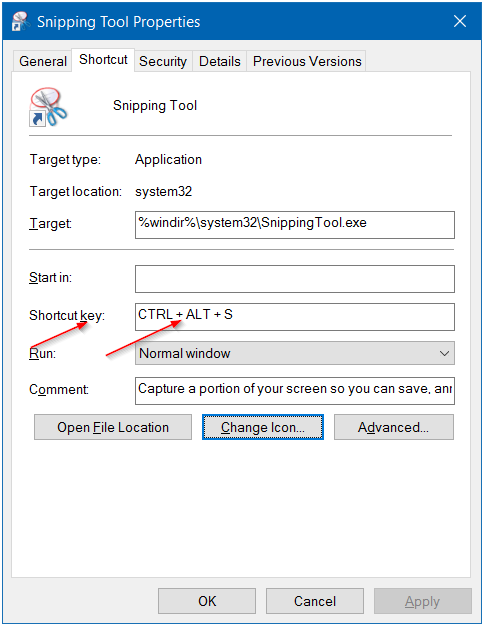
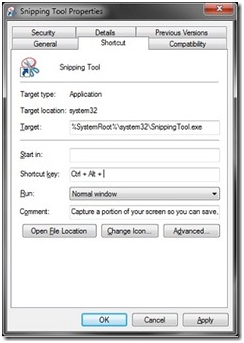
Step 3: In the Shortcut tab, go with the field next to Shortcut key, and after that enter a keyboard shortcut that you would like to create an open Snipping Tool.
Note that Windows by design add Ctrl + Alt as a prefix. So it’s wise to use a shortcut such as Ctrl + Al + S as the keyboard shortcut.
Tip: before you can do anything, pin your Snipping tool to the taskbar and then use the Windows key plus mathematical key to launch the tool. For example, if you pin the Snipping tool to the great left of the taskbar (next to the Start icon), then you press Windows + 1 key to open Snipping tool.
Instructions for Windows 7
Step 1: Go to Start > All Programs > Accessories. Right-click on Snipping Tool and select Properties.
Step 2: Move to the Shortcut tab. Select the Shortcut key box, and then press any desired keyboard key as your shortcut to the program.
Step 3: Now identify the new shortcut to the Snipping Tool and will also embed Ctrl + Alt as the prefix to the shortcut. If you have assign “S” key to Snipping Tool then you need to press Ctrl + Alt + S to launch, for example.
Step 4: Click Apply and remember your new keyboard shortcut!