

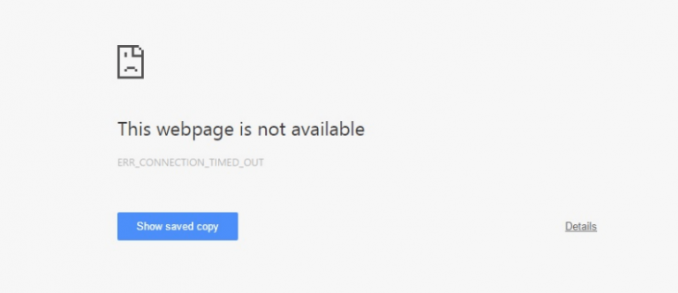
Err_Connection_Timed_Out: this error called for Internet errors and this error faced many people at this time. ‘Err Connection Timed Out’ is the user very specific error. These type errors see for few websites. But, don’t worry this error to be fixed with best tips, you check below guide.
However, you can follow steps below after fixing Error like Err_Connection_Timed_Out in your Windows XP, 7, 8 or 10.
How to Fix “Err Connection Timed Out” Error
Step 1: Update Windows Hosts File
Windows hosts file to block access to some sites. Also, Add IP addresses and website URLs in the hosts’ file to block to some other websites to get blocked. And you need to check the host’s file and see any website IP or URLs here and delete them. Also hosts file is located at c:\windows\system32\drivers\etc. But you do not edit the host’s file from there. But you edit the hosts file right click on Notepad and then click ‘Run as Administrator’ that is the best way.
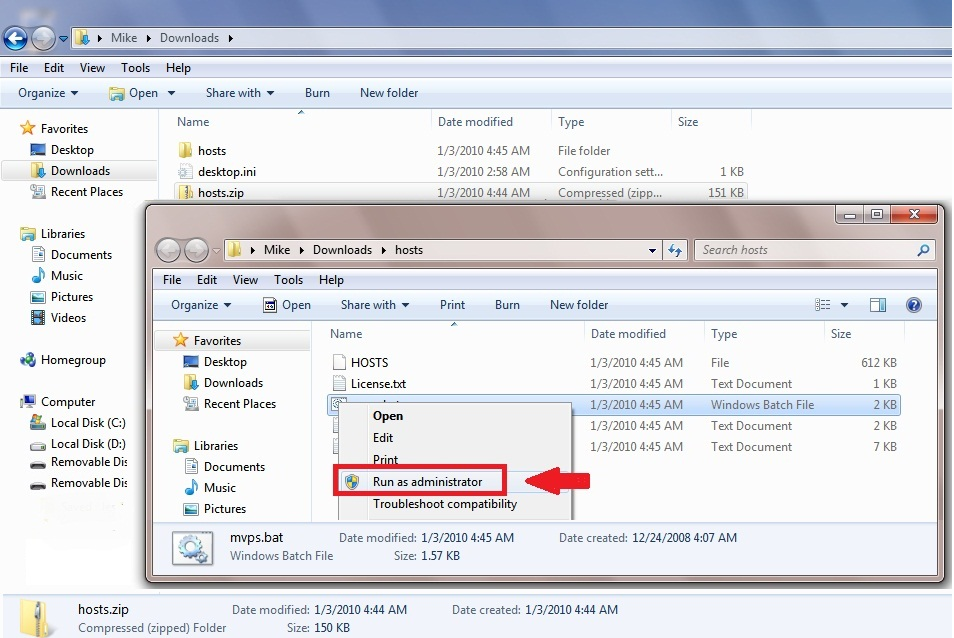
1#. Open notepad click on File.
2#. Open from the top left corner and then browse to Computer > Local Disk C: > Windows > System32 > Drivers > etc folder.
3#. After, select ‘All Files’ from the drop-down menu.
4#. After, select the ‘hosts’ file.
5#. Then, click Open.
6#. Scroll down and delete any website address or IP address.
7#. Then, the last # sign see.
8#. After, click on File > Save and close notepad.
9#. Done.
Step 2: Clear Browsing Data
Now, you check browsing data like cookies, app data, cache files etc because fixing the Err_Connection_Timed_Out error.
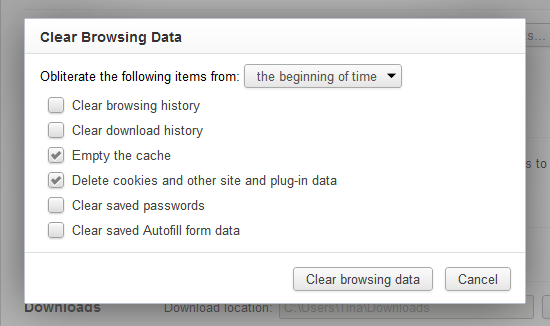
1#. First, Click on Customize and Control icon.
2#. After, click on ‘Settings’.
3#. Then, scroll down and click on ‘Show Advanced Settings’.
4#. Now under the ‘Privacy’ section.
5#. After, click on ‘Clear Browsing Data’.
6#. Then, select ‘the beginning of time’ from the drop-down menu.
7#. After, click on ‘Clear browsing data’ button.
8#. Then, restart your browser.
9#. Done
Step 3: LAN Settings
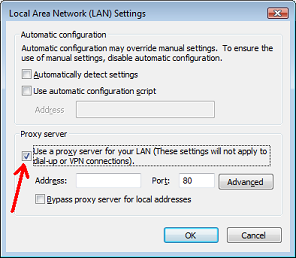
1#. First, LAN settings go to Start > Control panel.
2#. Windows 8 users can access the Control Panel from Settings menu.
3#. After, select the view mode from ‘Icon view’.
4#. Then, click on ‘Internet Options’.
5#. After, internet properties window will check.
6#. After, select the ‘Connections’ tab.
7#. After, click on ‘LAN Settings’ from the bottom right corner.
8#. Then, select the box to ‘Automatically Detect Settings’.
9#. After, then click OK.
10#. Restart your computer.
Step 4: Renew DNS and IP
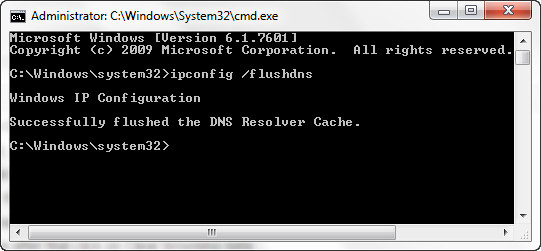
1#. Now, we will flush the DNS cache.
2#. Renew the IP address.
3#. Go to start menu.
4#. Next, type in cmd in the search box and click to enter.
5#. After, hit enter each line.
- Ipconfig /flushdns
- Ipconfig /registering
- Ipconfig /release
- Ipconfig /renew
- Netsh Winsock reset
6#. After, restart your computer.
Step 5: Talk to Your ISP
However, any time you face the issue and found that Internet Service Provider in a safe browsing zone. Then, Your ISP to make sure you are not in some sort of website filtering.
Final Words
However, the above mentioned all the steps in How to Fix “Err Connection Timed Out” Error and you read this article that is best helpful for you.